Saturday, June 9, 2012

Slouchy Oak

When the Mulberry Alexa first came to my attention at the beginning of 2010, it was instant obsession. I knew that I couldn't justify the hefty price tag, as much as I loved the satchel design, beautiful tan colour and effortless charm it exuded. I'd just splurged on a Balenciaga bag a few months prior, and was still dealing with having spent so much money for a bag. The Alexa remained on my mind as an object I admired and wished I owned, but always thought beyond my reach. Last week, an opportunity came my way to purchase the bag on sale, and I caved. I'm a little bit wary of "It bags", but I feel that the Alexa has a timeless quality. It's not super trendy, it doesn't scream designer, it's relatively unassuming. I'm telling myself it's an investment piece. I'm happy to have the real thing, and I'm looking forward to using it for years to come.


My two favourite images of the Alexa:

 (via hanneli)

Wednesday, June 6, 2012

Nude Parade

This post is somewhat overdue. I did my pinks and corals, now here's a rundown of my nude lipsticks. I don't wear nude lipstick often, though there's something inherently appealing about them. Maybe because when I think of nude lipstick, I imagine dark, sexy, smokey eye makeup and smouldering night time looks. We've all been schooled that a nude lip is the obvious companion to heavier eye makeup so that the eyes aren't competing with anything else. The main issue I have with nude lipsticks is that they take more effort to look good. I find they work best with a flawless, glowy base and strong, neutral eyes. Given that kind of makeup isn't exactly my everyday face, I don't have that many opportunities to wear nude lipstick. For the daytime, I usually prefer something with a bit more colour, or nothing at all.

My nude collection, from left to right in the pictures below:
  • Revlon ColorBurst in Soft Nude
  • Rimmel Moisture Renew in Nude Delight
  • Face of Australia Lip Quench in Iced Almond
  • BYS Longwear Lipstick in Beautifully Bare
  • BYS Lipstick in Champagne Rain
  • Australis Colour Inject Mineral Lipstick in Mambo


l-r: Soft Nude, Nude Delight, Iced Almond, Beautifully Bare, Champagne Rain, Mambo

It's kind of impossible to describe each individual colour, as they're all fairly similar and consist of varying amounts of beige/tan, pink and peach. Soft Nude is hands down my favourite. It neutralises and lightens my natural, medium reddish-brown lip colour to a soft, slightly peachy nude, while still working with my overall skin tone. I favour the texture and pigmentation of the ColorBurst lipsticks as I find that they apply to the lip really well without emphasising fine lines. I'm not a fan of really creamy lipsticks, as the product usually just sits on the surface of the lip and smears and smudges. Nude Delight is my second favourite, it's basically Soft Nude but darker and peachier. Iced Almond looks almost identical to Soft Nude in the swatch, but it's actually a touch lighter and has more pink, which looks slightly more brown when worn. Beautifully Bare is more of a medium brownish-pink, though it's still a distinctly nude lipstick on my lips. It's quite a wearable and natural looking colour. Champagne Rain is very close to Beautifully Bare, but the tiniest bit darker and more brown. It also has a hint of frostiness which I don't love. Mambo is utterly unflattering on me as it's way too brown and very much a skin colour. I'm sure it has the potential to look good on someone else, but on me it manages to remove the natural redness of my lips so all that's left is a dull, lifeless brown. If I really want to wear it, I need to apply a bright pink lip gloss over it to add some colour and warmth.

Monday, June 4, 2012

For the Highlight

I bought the Ecotools Bamboo 6 Piece Eye Brush Set on sale a few months ago from Priceline for about $16. At the time, I was unaware of iHerb, where you can purchase it for $7.22 (you can probably get it for even cheaper on eBay). The set consists of 5 brushes, with the 6th item being a hemp and cotton case with a mirror that I chucked in my bottom drawer and never looked at again. There's a Large Eye Brush, Angled Crease Brush, Petite Eye Shading Brush, Highlighting Brush and Smudge Brush. Like most Ecotools brushes, they're pleasingly soft, though some are firmer than others. I've ended up not using these brushes to apply my eyeshadow (I'm sticking with cheap, dual-ended Sportsgirl ones to do that), but I do use two of them all the time, one for blending and the other for slightly smudging out my lower lashline.

l-r: Highlighting Brush, Large Eye Brush, Angled Crease Brush, Petite Eye Shading Brush, Smudge Brush 


Large Eye Brush ("Blend")
This brush is wide (just under 2cm across), flat and soft. It reminds me of a mini foundation brush if anything. Given its size and shape, I don't really know who would be using this for blending, or to apply a wash of eyeshadow over the lid. It seems like you'd need a lot of eye space to get use from this brush. I guess it would be better used to apply and blend concealer under the eyes, or possibly as a brow highlight.

Angled Crease Brush ("Crease")
I have a similar brush from this Ecotools Alicia Silverstone set I purchased a while ago, but slightly smaller and firmer. An issue I've found with this kind of brush is that it doesn't pack on colour well. It's large, fluffy and better for blending than applying eyeshadows. The angled shape of this brush is ideal for blending out the outer corner of the eye, especially if you've applied a darker shadow for a gradient effect.

Petite Eye Shading Brush ("Shade")
It goes from one extreme to another in this set. This brush is ridiculously tiny (7mm across). It's also really thin and flat. How it's supposed to do anything (let alone "shade") is beyond me. The only purpose I can think of is lining the lower lashline (but even then, this wouldn't be the best brush as even though it's small, it's too thin and flat), or highlighting the inner corner of the eye.

Highlighting Brush ("Highlight")
The clear standout of this set and probably the only reason I bought it as I was specifically looking for a brush like this one. Ignore the "highlight" label. This is your standard fluffy blending brush. I alternate this brush with a similar shaped but slightly softer and larger one from the Ecotools 5 Piece Brush Set. It's perfect for blending eyeshadows and softening any harsh edges.

Smudge Brush ("Smudge")
My second favourite of the set, I use this to smudge eyeliner and/or eyeshadow applied to the lower lashline so it's a little more blended out and not so harsh. The pointed shape gives precision but is also still soft. Even if the brush only has one function, it serves it perfectly.

Saturday, June 2, 2012

Colour Shifters

It occurred to me that I haven’t given CoverGirl much love on my blog. For whatever reason, their products don’t call out to me. Currently the only CoverGirl products I use are the LastBlast Volume mascara and Wetslicks AmazeMint in Red Riot. I used to have their Eye Enhancers Quad in Country Woods which was one of the very first eyeshadows that I owned. I'm guessing I was 11 or 12. I remember liking it a lot, the shadows were nicely pigmented (better than rival Maybelline and other cheap eyeshadows I had), the quad consisted of warm wearable browns and had a good mix of light and dark, matte and shimmery shades.

Recently, I decided to take a closer look at the CoverGirl range. Mainly due to the fact I had a $10 voucher off CoverGirl products that I had to use before the end of May. I contemplated the obvious choices: one of their well-reviewed LipPerfection lipsticks (I was eyeing Heavenly intently), or repurchasing 
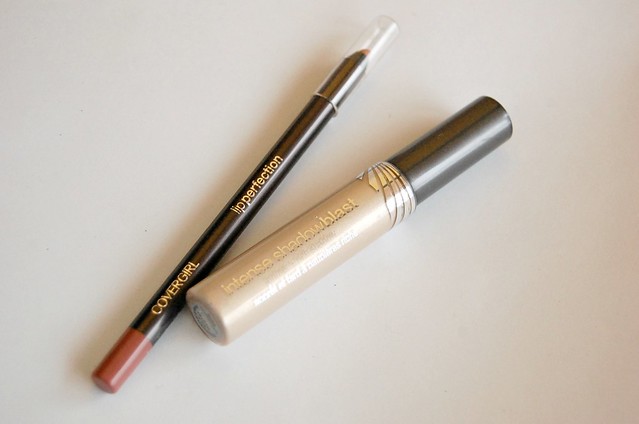
Country Woods. But I rationalised to myself they'd be the absolute last things I needed: more pink lipstick and brown eyeshadow. Instead, I opted for two products I wouldn't normally consider, a LipPerfection lip liner in Seduce (210) and Intense ShadowBlast in Beige Blaze (800).


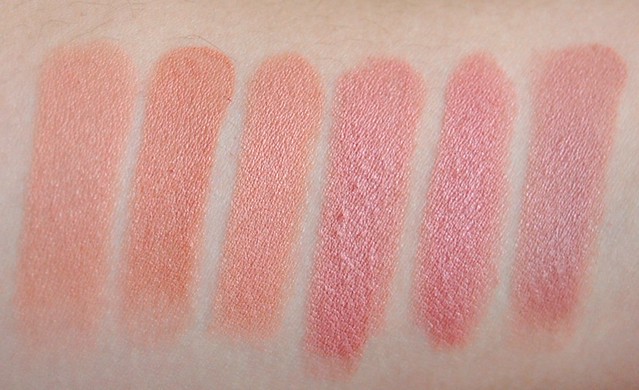
The first picture is my lips filled in with the LipPerfection lip liner in Seduce all over. The colour is a medium peachy nude which can be worn by itself or to neutralise one's natural lip colour. The picture on the left in the second row is my lips with Face of Australia Lip Quench lipstick in Pink Champagne. I've previously bemoaned that this lipstick is too cool and pinkish-purplish on me, but with Seduce as a base it magically transforms into a noticeably warmer and more yellow-toned pink. I wouldn't have thought to use lip liner in this way, but it's surprisingly effective. More so than using a nude lipstick underneath, as mixing lipstick can be a little messy, especially if they're on the creamy side. The lip liner on the other hand really adheres to and almost soaks into the lip, possibly due to the fact I find the formula a little drying.

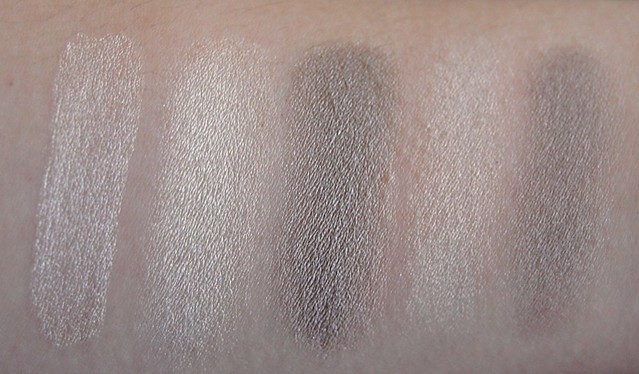
l-r: Beige Blaze, Essence Mystic Lemon and Taupe of the Pops (with Beige Blaze), without

The IntenseShadow Blast in Beige Blaze was a product I was first introduced to in this video by Zoƫ Foster where she goes through her travel makeup bag essentials (it appears at 4:15, and she's also written about it). After a quick Google search (this review swayed me in particular), I decided that I needed to have this seemingly all-purpose miracle tool (primer, cream eyeshadow, eyeshadow intensifier, cross between Urban Decay Primer Potion in Sin and Eden). Taking it home, the first thing that struck me about it was the smell. I don't know if it's because the product's been sitting on the shelf for 2 years, but it has this distinct slightly sour, metallic smell that I find really off-putting. The colour itself is an intensely shimmery, yellow-leaning champagne. After about two minutes, it sets to the point where you can't rub it off, so it's best to blend it out with the finger straight after you've applied it to the lid.

I definitely can see a difference to the intensity of eyeshadows when it's used as a primer. I tested it with two fairly ordinary eyeshadows, Essence single eyeshadows in Mystic Lemon and Taupe of the Pops (reviewed more in depth here). I'm guessing if I used already very pigmented eyeshadows, the difference wouldn't be as apparent. The swatch above shows the difference between the Beige Blaze applied underneath the eyeshadows and without. Instantly richer and more pigmented, though Taupe of the Pops looks somewhat distorted in colour due to the shimmery yellow undercurrent from the Beige Blaze (not so much a problem for Mystic Lemon, which is practically the same colour). For this reason I'd recommend using Beige Blaze only with similar eyeshadow colours. I tried it on my lids and I didn't notice a significant improvement from the existing cream eyeshadows that I use for my base/primer, but possibly because I only used a very small amount and blended it out with my finger so it ended up quite sheer. To me, this product would be best used to intensify underperforming beige/champagne/yellow/gold eyeshadows and really make them come to life.
Related Posts Plugin for WordPress, Blogger...